One of the joys of setting up Gallifrey is getting to try a lot of the things I’ve been interested in for a long time but haven’t had the opportunity to implement. Things like putting in swales and designing a food forest, like large scale outdoor sculptures (I haven’t done any of that yet, but I’m thinking about it), like building a straw bale house, and putting in a big vegetable garden in a good location where I can grow tasty things. Gardens give me so much joy, I’ve wanted to build one of my own for as long as I can remember.
The vegetable garden is, relative to the whole Gallifrey forest project, a small bit of work. It’s also something which can be set up before we’ve got the house built and are living up there, because vegetables don’t need daily attention as long as there’s some kind of automatic watering system and they’re protected from pests. So I designed a vegetable garden.
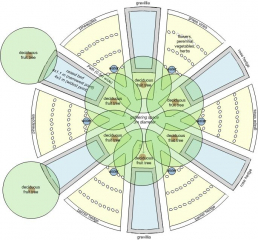
The design is a mandala pattern, based on a flower mandala I found on the internet. It is centred on a circular open space, with benches for people to sit and rest and admire the garden. This area is surrounded by six stone fruit trees (two cherries, a peach, an apricot, a plum and an almond) which will provide some light shade in the summer for both the people and the garden beds. The trees should all flower at much the same time, providing a springtime display like the Japanese and Korean cherry blossom festivals, but in miniature.
Surrounding this central area are six raised garden beds, for annual vegetables, and siz in-ground beds for perennial vegetables and more spreading annuals. Both the raised and in-ground beds will be hugelkultur beds, to improve the water-retention of the soil without affecting the drainage. This has the added benefit of using some of the dead wood which is currently lying around on the property acting as a fire hazard.
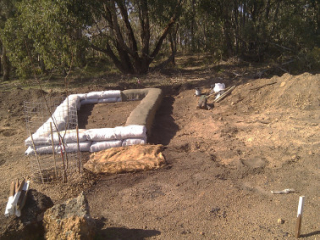
The raised beds we decided to build using earthbags. Partly this was because I wanted to try building something with earthbags, and partly it was because the misprinted grain sacks are cheap and the gravel and dirt to fill them is free, since it’s dug from the site. We have to dig the area out anyway, because the in-ground beds have to start out as holes in the ground which can be filled with dead wood and then topped up with topsoil and compost. The alternatives (building raised beds with bricks, or buying corrugated iron to make them with, or similar) are expensive and/or much more time-consuming.
Earthbags, though, have to be rendered. The bags are made of polypropylene, which is almost indestructible in the dark, but degrades in UV light. Immediately I thought of trying burlapcrete. What is burlapcrete, you may ask. That’s a good question. The short version of the answer is pretty simple – it’s concrete laid using hessian fabric (otherwise known as burlap, or sack cloth) as a substrate and support. Basically the same idea as ferrocement, but instead of using chicken wire or rebar to strengthen the concrete.
There’s a bit of information available online about this idea, mostly in forum posts. Notably, John Annesly’s 2004 blog post on the subject is very thorough, and suggests various concrete mixes as well as offering some very useful general advice.
What we did was mix up a standard rich cement mix (1 part portland cement to 3 parts plasterers’ sand), but mixed it to a much wetter slurry than normal. The consistency was more like runny yoghurt than thick, creamy cement. Then we dipped lengths of wet hessian into the mix, and draped them over the filled and placed earthbag walls. It worked remarkably well, even with just one layer. The raised beds are solid enough to walk on without the cement shell cracking, and they look pretty good, I think. Especially considering we didn’t really know what we were doing until after we’d done it.


For anyone who, looking at the design diagram, doesn’t understand it – the little round circles running in lines across the in-ground beds are stepping stones so we can avoid walking on the garden beds themselves.
I also forgot to mention that this design is intended to work in a 6 year rotation for the raised beds. At the end of each growing season we’ll put a (custom built trapezoidal) chicken tractor onto the raised bed and let our chooks scratch the remaining vegetable matter, bugs, and weed seeds out and fertilise the ground with their poo, ready for the next growing season.